FlightCoach – Instructions for Use
This document is a work in progress. Please send updates and other things you learn to rudy AT choreolectronics.com.
1. First Time
When you first get the units, please connect it to your network. In this setup, you’ll be connecting to the device on your phone, entering the network name and password of your home network, and then saving that configuration. This will let FlightCoach update its internal software and upload log files.
To start, the unit will go to connection mode right at start-up or use Menu->Wifi Setup to do so.
In connection mode, you connect your phone to the unit. FlightCoach will display a wifi SSID on its screen. On your phone, connect to that wifi network. Once connected, start a web browser and connect to http://192.168.4.1. This link should only work when you’re connected to the FlightCoach unit.
When you’re connected click ‘Configuration.’
Where the unit asks for ‘SSID,’ enter your home network’s name. Under ‘Password,’ enter your home network’s password. Click Save, and that information will be saved to internal memory. FlightCoach will then reboot.
While connected, FlightCoach will download any new code updates and install them. It also uploads saved data from your flights.
The first time it starts up, it goes straight to a short tutorial. Afterward, you can get to that tutorial at any time through the Main Menu.
2. Calibration
Calibrate FlightCoach in your plane. Right now, there are four sound calibrations and two accelerometer calibrations. Here is the list and an explanation of each calibration:
1. Idle
After warming up your plane, with the throttle set to the most idle position, record this calibration value. The idle calibration is used to determine the state of the plane with the least engine noise and wind noise.
2. Slow Flight
While flying at a safe altitude and in the manner taught for your airplane, bring the plane down to slow flight. We’re looking for flight that is a bit above stall (so the horn isn’t going off). Then record the calibration value. This is the value that the unit compares against to determine if you are close to slow flight. It also records the pitch-up attitude of your airplane. The pitch-up attitude is used as part of the calculations to determine if you are slipping.
3. Cruise Flight
While flying in a normal cruise configuration with your speed settled at cruise speed, record the calibration value. This value is used to determine the state of the plane with high wind and high engine noise.
4. Alternate
This fourth calibration value is here to help FlightCoach distinguish slow flight from other common flight configurations you use. You can record any cockpit configuration that is not slow flight. This might be a configuration you fly in frequently – perhaps you frequently fly at 55% power or perhaps you fly at VA frequently. Setting up the Alternate calibration value will help if FlightCoach is confusing certain flight regimes with slow flight.
Another way to use the Alternate calibration value is to simply record the sound of silence. FlightCoach continuously tries to classify every sound received into one of the four calibration categories. If it’s detecting “Slow Flight” when you’re using the device at home, just record that silence here and it should stop making that mistake.
5. Maximum ball deflection
This is the final calibration on the Calibration screen of FlightCoach. This calibration value sets the maximum deflection of the ball that will trigger the Uncoordinated Flight alert. At a safe altitude and in the manner taught for your airplane, set in a slip that corresponds to this maximum deflection. Record this calibration value.
6. Pitch Up
This final calibration is actually in the Debug menu and may ultimately be removed. A user normally does not need to record Pitch Up because it is automatically recorded as part of the slow flight configuration. The pitch up calibration value allows the accelerometer to calculate the acceleration due to uncoordinated flight. However, if you move the FlightCoach or start placing it in a different area of the cockpit, you may need to re-record this.
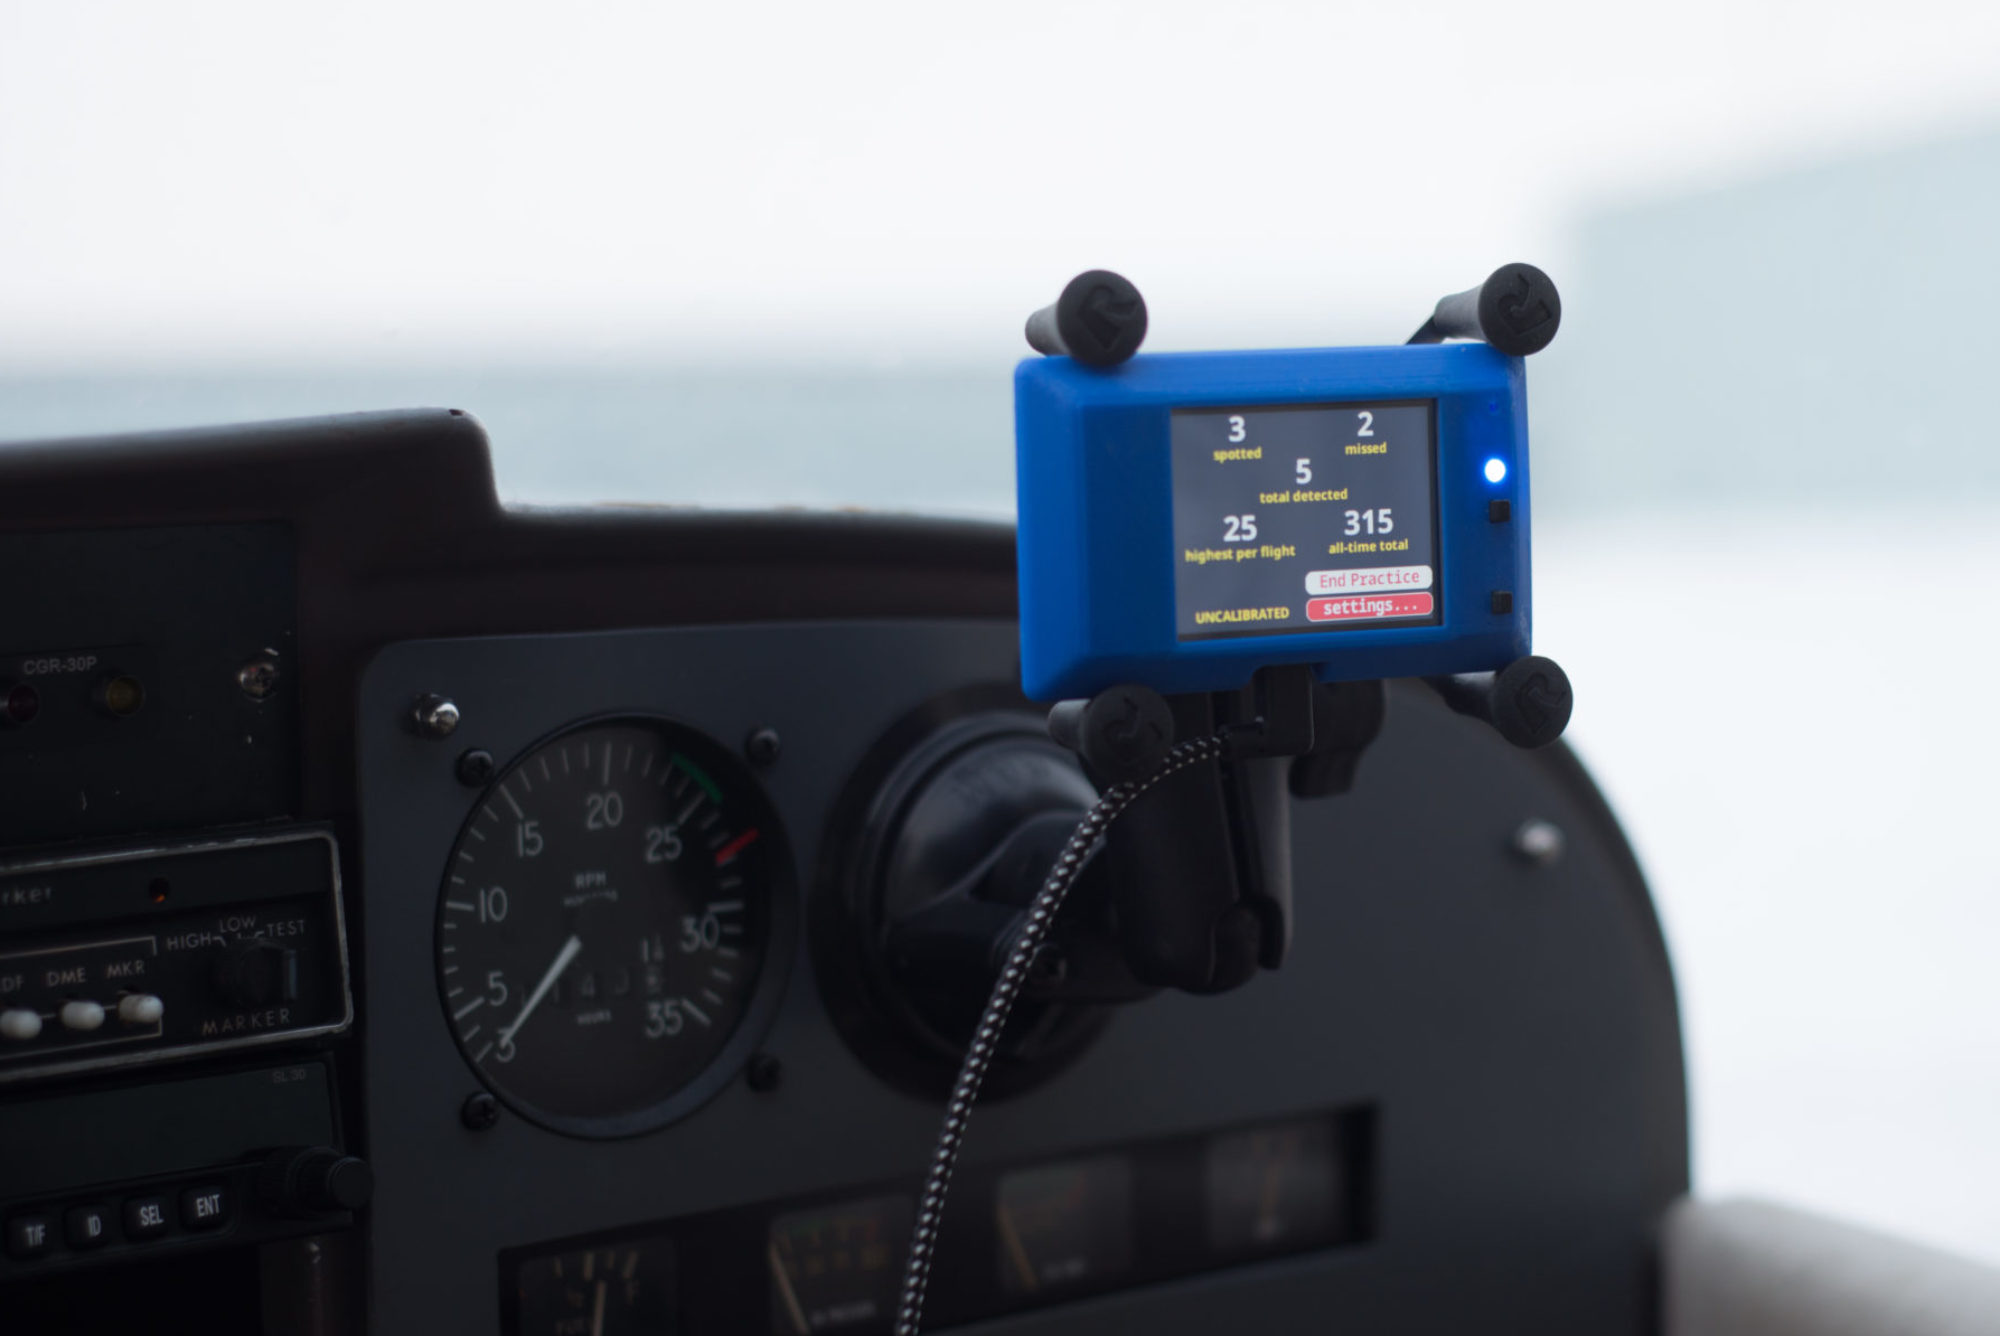
3. Operation
Mount FlightCoach with the clip on the back or using a cell phone holder. You can mount it in any orientation. If you hold the corner button down, the screen will reorient in that direction. Certain functions (like the tutorial) look best in its default orientation.
Power up the unit with a USB power supply, either on your panel or a hand held power bank.
If FlightCoach needs to be calibrated, it starts in the setup screen. Otherwise is starts out running.
It automatically starts detecting slow flight and uncoordinated flight from the get go.
When an alert shows, you can acknowledge it and make the alert disappear by touching the screen on the alarm. A second touch will rearm the alert immediately, or you can just wait for the count down timer to expire.
If you know you’re going to go into slow flight or uncoordinated flight, touch the screen before you get there to tell FlightCoach you recognize the situation. Touch on the left for slow flight. Touch on the right for a slip.
Your current flight score shows up on the top line.
4. When your flight is over
When you head home, power up FlightCoach in your wifi. Your results will upload so we can study how well this works in the real-world. What we are hoping to see is a steady improvement in pilot recognition of potential loss-of-control situations. Everyone is at a different spot on the curve of how well they recognize slow and uncoordinated flight. We hope to collect and analyze data from people that are just starting out all the way up to people that are experts at this in order to better understand how people learn.
5. Other useful controls
Re-calibration – You can re-calibrate any entry just be rerecording over the current entry. If you’d like to wipe all the calibration values, use the Clear All command in the Calibration menu.
Orientation – Pressing and holding the Enter button on the corner of the device causes the screen to reorient to whatever orientation the screen is in at that moment. Remember to calibrate the slip angle and the pitch angle (in the debug menu) after reorienting.
Screen Capture – you can take a snap shot of the configuration to draw my attention to something happening. Just press and hold the Next button until “Screen Cap” is printed in the lower left hand corner of the screen.
The device operates just fine completely hands-off. Don’t let it distract you in flight. You can notify FlightCoach that you are about to go into slow flight or slip the plane, but you don’t need to. It still records interesting information. If you do choose to interact with it, always make sure you’re doing so at a safe altitude when when your pilot workload is low. If you have a co-pilot, consider using them to operate FlightCoach.
Thank you for helping me test FlightCoach!!!